Monday, February 16, 2009
Friday, February 13, 2009
Raytracer Comparison
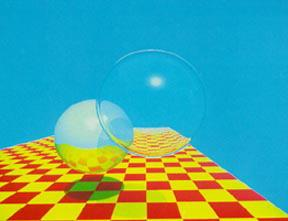
Well, formal checkpoints for this project have all been completed. I thought it would be a good time to show a comparison of my work and the original raytraced Whitted image.
I added a noisy filter to my system that can be enabled to give more realistic texture to otherwise solid blocks of color. This helps to when matching against the original image, which contained blurry noise. (Likely because the image is from a photograph, not the original digital output.)
The only big feature missing from my system that keeps it from matching Whitted's is the soft reflection on the smaller sphere. I only implemented hard reflections because I was focusing on maintaining realtime performance. This scene runs at 44 frames per second on a MacBook without supersampling.
My raytracer:
My raytracer with noise enabled:
My goal:
(Original Whitted Raytracer image)
Checkpoint 7 Completed: Tone Mapping
This checkpoint was all about tone mapping high dynamic range images onto low dynamic range displays. The lmax value maximum possible luminance of the world- the original image is scaled by it before the operators are used. A display luminosity max of 100 was used.
Ward: (Perceptual)
Ward, lmax = 1
Ward, lmax = 1000
Ward, lmax=10000
Reinhard: (Photographic)
Reinhard, lmax = 1
Reinhard, lmax = 1000
Reinhard, lmax = 10000
Extras
Reinhard, lmax = 10000, key luminance = luminance at pixel (0,0)
Reinhard, lmax = 10000, key luminance = 0.1
Ward: (Perceptual)
Ward, lmax = 1
Ward, lmax = 1000
Ward, lmax=10000
Reinhard: (Photographic)
Reinhard, lmax = 1
Reinhard, lmax = 1000
Reinhard, lmax = 10000
Extras
Reinhard, lmax = 10000, key luminance = luminance at pixel (0,0)
Reinhard, lmax = 10000, key luminance = 0.1
Friday, February 6, 2009
Checkpoint 6: Transparency & Refraction
Friday, January 30, 2009
Radiosity - video of progress
This video shows where I am currently with the radiosity project. It still is only a single bounce of light, but the calculations used for that bounce are now much more accurate. The initial calculation of the lighting takes about 9 seconds, then the scene runs at 200 fps.
Ray Tracer Checkpoint 5: Reflection
All of these scenarios run at around 24 fps on a MacBook. In my realtime demo, the light moves and the foreground ball bounces
Main Image:
Single reflective sphere over checkerboard
Bonus images: (Just for fun!)
Recursive reflections- look close at the reflection on the silver ball.
Reflections + Bumpmapping = distorted reflections!
Reflections + textures
Main Image:
Single reflective sphere over checkerboard
Bonus images: (Just for fun!)
Recursive reflections- look close at the reflection on the silver ball.
Reflections + Bumpmapping = distorted reflections!
Reflections + textures
Monday, January 19, 2009
Radiosity midway checkpoint
The progress report for the radiosity project is available here.
Executive Summary: Project is on schedule, no changes need to be made to the deliverables.
Raw, unlit scene
Scene with simplified 1-bounce lighting
(hemicube is not calibrated yet)
With lighting interpolated across patches
Executive Summary: Project is on schedule, no changes need to be made to the deliverables.
Raw, unlit scene
Scene with simplified 1-bounce lighting
(hemicube is not calibrated yet)
With lighting interpolated across patches
Wednesday, January 14, 2009
Checkpoint 4 Completed
Click here to view a youtube video of the new effects for Checkpoint 4.
Main Image: Procedural checkerboard floor
Extra: Images from a file as textures, with bilinear filtering
Extra: Proceedural Julia-set fractal as a texture, animated over time
View a closeup of another animated fractal I created.
Main Image: Procedural checkerboard floor
Extra: Images from a file as textures, with bilinear filtering
Extra: Proceedural Julia-set fractal as a texture, animated over time
View a closeup of another animated fractal I created.
Wednesday, January 7, 2009
Checkpoint 3 Completed
Checkpoint 3 involoved adding Phong shading and shadows to the raytracer.
Main image of phong shading:
Single light - note that this scene runs at real-time speeds
Extra: Multiple lights
Watch: Youtube video of the above scene with moving lights
Extra: Blinn-Phong specular calculation
This uses the 'halfway' vector to compute the specular strength
(exponent = 100)
Other interesting visuals produced:
"Beer-googles mode" Click here for video
"Artistic noisy image mode" Click here for video
Subscribe to:
Posts (Atom)