Well, formal checkpoints for this project have all been completed. I thought it would be a good time to show a comparison of my work and the original raytraced Whitted image.
I added a noisy filter to my system that can be enabled to give more realistic texture to otherwise solid blocks of color. This helps to when matching against the original image, which contained blurry noise. (Likely because the image is from a photograph, not the original digital output.)
The only big feature missing from my system that keeps it from matching Whitted's is the soft reflection on the smaller sphere. I only implemented hard reflections because I was focusing on maintaining realtime performance. This scene runs at 44 frames per second on a MacBook without supersampling.
My raytracer:
My raytracer with noise enabled:
My goal:
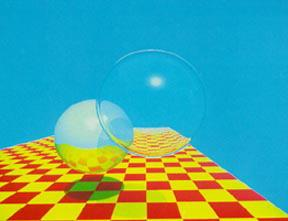
(Original Whitted Raytracer image)
Showing posts with label raytracer. Show all posts
Friday, February 13, 2009
Friday, February 6, 2009
Checkpoint 6: Transparency & Refraction
Friday, January 30, 2009
Ray Tracer Checkpoint 5: Reflection
All of these scenarios run at around 24 fps on a MacBook. In my realtime demo, the light moves and the foreground ball bounces
Main Image:
Single reflective sphere over checkerboard
Bonus images: (Just for fun!)
Recursive reflections- look close at the reflection on the silver ball.
Reflections + Bumpmapping = distorted reflections!
Reflections + textures
Main Image:
Single reflective sphere over checkerboard
Bonus images: (Just for fun!)
Recursive reflections- look close at the reflection on the silver ball.
Reflections + Bumpmapping = distorted reflections!
Reflections + textures
Wednesday, January 14, 2009
Checkpoint 4 Completed
Click here to view a youtube video of the new effects for Checkpoint 4.
Main Image: Procedural checkerboard floor
Extra: Images from a file as textures, with bilinear filtering
Extra: Proceedural Julia-set fractal as a texture, animated over time
View a closeup of another animated fractal I created.
Main Image: Procedural checkerboard floor
Extra: Images from a file as textures, with bilinear filtering
Extra: Proceedural Julia-set fractal as a texture, animated over time
View a closeup of another animated fractal I created.
Wednesday, January 7, 2009
Checkpoint 3 Completed
Checkpoint 3 involoved adding Phong shading and shadows to the raytracer.
Main image of phong shading:
Single light - note that this scene runs at real-time speeds
Extra: Multiple lights
Watch: Youtube video of the above scene with moving lights
Extra: Blinn-Phong specular calculation
This uses the 'halfway' vector to compute the specular strength
(exponent = 100)
Other interesting visuals produced:
"Beer-googles mode" Click here for video
"Artistic noisy image mode" Click here for video
Wednesday, December 17, 2008
Checkpoint 2 Completed
Checkpoint 2 status: Complete + 2 extras
Tech: C++, OpenGL/GLUT for pixel buffer placement.
Supports: Spheres, Infinite Planes, Quads, Triangles, Supersampling, .obj 3d models
Extra: Supersampling
Here you can see the addition of supersampling and an attempt at drawing the checkerboard pattern on the floor polygon.
Extra: Triangles!
I added the ability to do intersection tests against triangles. The obvious thing to do with this functionality was to try raytracing a large triangle mesh loaded from a file. The teapot shown here is made from over 6 thousand triangles. I perform a bounding-sphere test first to see if a ray is near the model before actually doing an intersection test on the triangles. Also, backface culling is used because the object is perfectly opaque.
Testing with such a large model really helped me to find issues inside my code that I would not usually have noticed: It was leaking memory at a huge rate, and would run out of memory by hitting the 2gb limit for 32 bit applications!
Now, I can trace the scene using only about 16mb of ram.
General Benchmark: the screenshot above, 400x400, 6320 triangles, with 4x supersampling enabled, took about 20 seconds on a MacBook.
Friday, December 12, 2008
First result of raytracer!
Tuesday, December 9, 2008
Raytracer Checkpoint 1: Scene Layout
I designed a scene layout to match Whitted's original rendering. This image was simply drawn with OpenGL to get the general geometry of the scene. The spheres are near each other but not quite touching.
The settings are as follows:Foreground sphere: at [0,0,-2.6] radius = 1.0
Background sphere: at [-1.2,-1.0,-3.7] radius = 0.9
Floor plane corners:
- (-8,-2,0)
- (2.7,-2,0)
- (2.7,-2,-15)
- (-8,-2,-15)
Light source
- Location: (2.0, 5.0, 0.0)
- Diffuse: (0.7, 0.7, 0.7)
- Ambient: (0.4, 0.4, 0.4)
Camera
- Position: (0,0,1)
- Lookat: (0,0,0)
- Up: (0,1,0)
- Field of view = 60.0 degrees
- Aspect ratio = 1.3 (640/480)
Subscribe to:
Posts (Atom)